

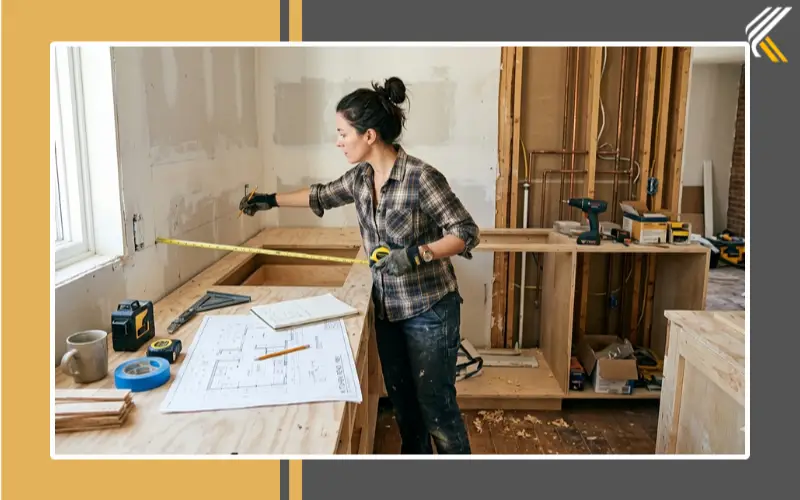
A kitchen remodel sounds exciting until you start getting installation quotes. Many homeowners are shocked when they realize professional kitchen fitting can cost thousands of dollars before cabinets, countertops, or appliances are even added. That is usually the moment people start searching for kitchen fitting by yourself. The problem is that most DIY kitchen guides make the process look much easier than it actually is. Many beginners worry about crooked cabinets, plumbing leaks, incorrect measurements, wasted materials, and projects taking far longer than expected. Those fears are completely understandable because even small mistakes during a kitchen renovation can become expensive very quickly. A successful DIY kitchen remodel is not only about installing cabinets correctly, but also about creating better kitchen storage and organization systems that improve everyday functionality and reduce clutter over time.
I learned this during my own DIY kitchen renovation. At first, I thought installing cabinets would simply be a weekend project with a few tools and online tutorials. But after removing the old kitchen, I discovered uneven floors, hidden wall damage behind the sink cabinet, and measurements that no longer matched the original layout. I also underestimated how stressful some tasks could become, especially lifting wall cabinets alone and trying to level base units on a sloped floor. Over time, I realized that successful kitchen fitting is not about working fast. It is about careful planning, patience, and solving problems step by step. This guide is built to help beginners avoid common mistakes, save money, and complete a DIY kitchen installation with more confidence.
Kitchen Fitting by Yourself- Quick Summary:
Kitchen fitting by yourself can help homeowners save thousands of dollars, but the process requires careful planning, patience, and realistic expectations. This guide explains every important step of DIY kitchen installation, including layout planning, cabinet fitting, flooring, plumbing, lighting, ventilation, and common mistakes to avoid. It also shares real personal experiences and beginner pain points to help homeowners complete their kitchen remodel with more confidence and fewer costly errors.
DIY Kitchen Fitting Checklist
Use this quick checklist before starting your DIY kitchen installation project.
| Task | Completed |
|---|---|
| Measure kitchen walls | ☐ |
| Check floor level | ☐ |
| Plan cabinet layout | ☐ |
| Confirm appliance sizes | ☐ |
| Locate wall studs | ☐ |
| Prepare plumbing and electrics | ☐ |
| Gather tools and materials | ☐ |
| Remove old kitchen | ☐ |
| Install base cabinets | ☐ |
| Install wall cabinets | ☐ |
| Fit countertops | ☐ |
| Install backsplash | ☐ |
| Test plumbing and electrical work | ☐ |
Can You Fit a Kitchen Yourself?
Yes, many homeowners can fit a kitchen themselves, especially if they are comfortable using basic tools and following instructions carefully.
Simple DIY jobs include:
-
- removing old cabinets,
-
- assembling units,
-
- painting walls,
-
- fitting shelves,
-
- installing handles,
-
- adding backsplash panels.
More advanced tasks include:
-
- plumbing,
-
- electrical work,
-
- gas appliance connections,
-
- countertop cutting.
Many beginners underestimate how physically demanding kitchen installation can be. Lifting cabinets, leveling units, and moving appliances often take longer than expected.
However, with realistic expectations and proper preparation, DIY kitchen fitting can save thousands of dollars compared to hiring full professional installers.
Who This DIY Kitchen Fitting Guide Is For
This guide is ideal for:
-
- first-time DIY homeowners,
-
- budget-conscious renovators,
-
- people comparing DIY vs professional installation,
-
- homeowners wanting more control over their remodel,
-
- DIY enthusiasts who enjoy hands-on projects.
If you want professional-looking results while reducing labor costs, this guide will help you understand what you can safely do yourself and what jobs may require licensed professionals.
Why Many Homeowners Choose DIY Kitchen Installation
The biggest reason homeowners choose kitchen fitting by yourself is cost savings.
Professional kitchen installation labor in the USA can easily cost:
-
- $5,000,
-
- $10,000,
-
- or even more for large kitchens.
Many homeowners decide to handle parts of the renovation themselves to reduce those costs.
Other reasons include:
-
- personal satisfaction,
-
- creative freedom,
-
- flexible scheduling,
-
- learning new skills,
-
- increasing home value.
For many DIYers, finishing a kitchen project brings a strong sense of achievement that hiring contractors cannot provide.
What You Need Before Starting
Good planning is the foundation of every successful DIY kitchen renovation.
Before buying materials, think carefully about:
-
- kitchen layout,
-
- cabinet measurements,
-
- appliance spacing,
-
- plumbing locations,
-
- electrical outlets,
-
- lighting,
-
- ventilation,
-
- storage needs.
Measure:
-
- wall widths,
-
- ceiling height,
-
- windows,
-
- doorways,
-
- appliance openings.
Measure everything twice. Small measurement mistakes can create expensive problems later.
One of the biggest lessons I learned was never trusting old kitchen dimensions without checking them carefully myself.
One mistake I made early was assuming my walls were perfectly straight. After checking with a level, I realized one corner of the room leaned slightly, which later affected cabinet spacing. Taking extra measurements saved me from reinstalling several units later.
Essential Tools for Kitchen Fitting by Yourself
You do not need every professional contractor tool, but some equipment is essential.
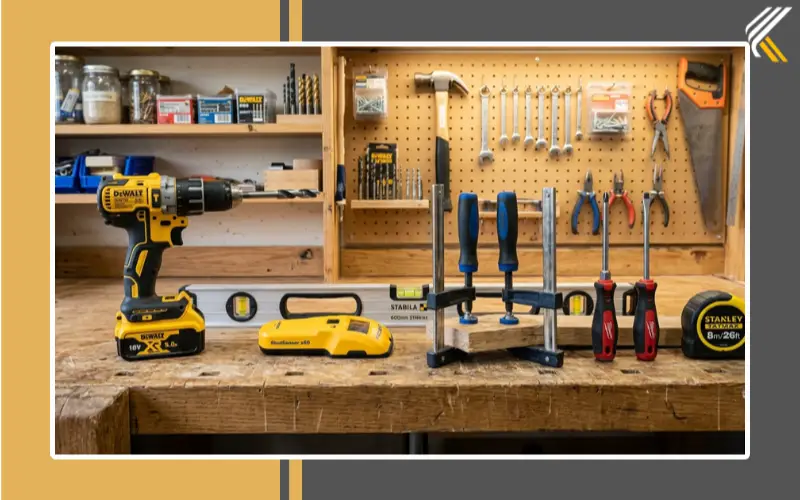
Must-Have Tools
-
- tape measure,
-
- spirit level,
-
- drill,
-
- screwdriver,
-
- stud finder,
-
- clamps,
-
- utility knife,
-
- jigsaw,
-
- hammer,
-
- pencil,
-
- safety glasses.
Helpful Extra Tools
-
- laser level,
-
- circular saw,
-
- cabinet lifting jack,
-
- workbench,
-
- pipe wrench.
A cabinet lifting jack can be especially useful for homeowners working alone.
Buying quality tools may cost more upfront, but cheap tools often create frustrating installation problems.
I originally tried using an old low-quality drill to save money, but it struggled badly with cabinet screws and wall studs. Upgrading to a stronger drill made the installation faster and far less frustrating.
How Much Does DIY Kitchen Fitting Cost?
One of the strongest advantages of DIY kitchen installation is the potential savings.
Here is a general USA cost comparison.
| Task | DIY Cost | Professional Cost |
|---|---|---|
| Cabinet installation | $300–$800 | $2,000–$5,000 |
| Backsplash | $150–$400 | $800–$2,000 |
| Sink installation | $100–$300 | $500–$1,200 |
| Flooring | $300–$1,000 | $2,000–$6,000 |
DIY projects still include:
-
- tool purchases,
-
- delivery fees,
-
- permit costs,
-
- material waste,
-
- replacement parts.
Even with those expenses, many homeowners still save thousands compared to full-service installation.
DIY vs Professional Kitchen Installation
| Factor | DIY Installation | Professional Installation |
|---|---|---|
| Cost | Lower | Higher |
| Time Required | Longer | Faster |
| Skill Needed | Moderate | Professional |
| Risk of Mistakes | Higher | Lower |
| Personal Satisfaction | High | Low |
| Permit Knowledge | Must Research | Contractor Handles |
| Flexibility | Full Control | Limited Control |
Planning Your Kitchen Layout
A smart kitchen layout improves both cooking and storage.
Popular kitchen layouts include:
-
- galley kitchens,
-
- L-shaped kitchens,
-
- U-shaped kitchens,
-
- island kitchens.
Keep the sink, refrigerator, and stove close enough for smooth movement. This setup is known as the kitchen work triangle.
The kitchen work triangle helps reduce unnecessary walking while cooking. Avoid blocking these work zones with islands or oversized furniture.
Also consider:
-
- cabinet door clearance,
-
- traffic flow,
-
- lighting placement,
-
- trash storage,
-
- appliance ventilation.
Planning these details early prevents many common DIY problems later.
Before finalizing my layout, I walked through the kitchen pretending to cook meals. That simple test helped me notice awkward movement between the refrigerator and stove that I had completely missed on paper.
Smart Kitchen Storage Planning
Many homeowners focus only on cabinet appearance and forget about storage functionality.
Good storage planning makes everyday kitchen use much easier. If your goal is to maximize every inch of cabinet space, these extreme kitchen cabinet organization ideas can help create a more efficient, clutter-free layout.
Helpful storage solutions include:
-
- pull-out pantry shelves,
-
- deep drawers for cookware,
-
- corner carousel cabinets,
-
- vertical tray storage,
-
- spice organizers,
-
- built-in trash bins.
One of the most common renovation regrets is not including enough drawer storage during the design phase. Many homeowners also add DIY pull-out shelves for kitchen cabinets during renovations to improve storage access and reduce clutter inside deep cabinets.
Removing the Old Kitchen
Before installing your new kitchen, the old one must be removed carefully.
Steps to Remove an Old Kitchen
-
- Turn off electricity and water.
-
- Disconnect appliances.
-
- Remove cabinet doors.
-
- Take down wall cabinets first.
-
- Remove base cabinets.
-
- Remove countertops.
-
- Clean the room completely.
Wear gloves and eye protection during demolition work.
Taking photos before disconnecting plumbing or electrical lines can help during reinstallation later.
Removing the old cabinets looked easy online, but some units were much heavier than expected. I also discovered hidden wall damage behind the sink cabinet from an old plumbing leak that was never visible before demolition.
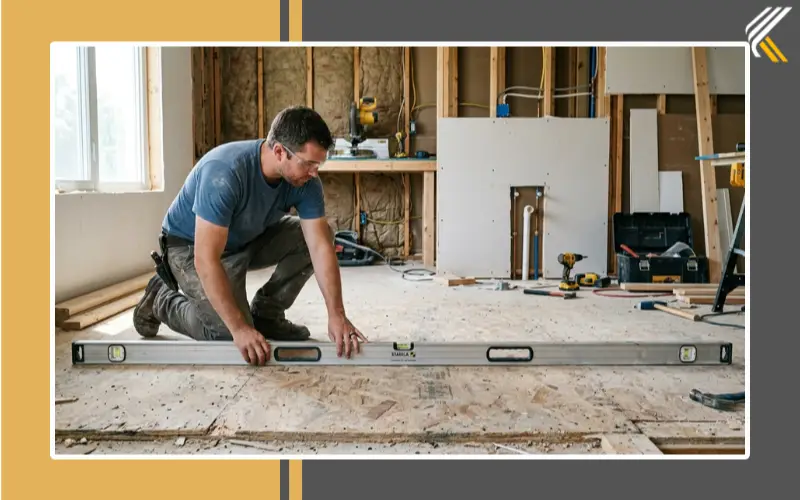
Preparing Walls and Floors
This step is extremely important, but many beginners rush through it.
Walls and floors should be clean, smooth, and level before cabinet installation begins.
Inspect for:
-
- water damage,
-
- cracks,
-
- mold,
-
- uneven floors,
-
- loose drywall.
Uneven flooring is one of the biggest hidden DIY problems. Even small floor slopes can throw cabinet alignment off across the entire kitchen.
During my own renovation, I had to reposition cabinets multiple times because the floor was not level.
Repair:
-
- damaged drywall,
-
- weak subfloors,
-
- wall cracks,
-
- rough surfaces
before installation begins.
I almost skipped checking the floor level because it looked flat to the eye. Thankfully, I tested it with a long spirit level first. The floor dropped nearly half an inch across one side of the kitchen, which explained why the old cabinets looked uneven.
Should Flooring Be Installed Before Cabinets?
This is one of the most searched kitchen renovation questions.
The answer depends on the flooring material.
Install Flooring Before Cabinets If You Have:
-
- tile flooring,
-
- nailed hardwood,
-
- glued hardwood,
-
- permanent flooring systems.
Install Flooring After Cabinets If You Have:
-
- floating laminate,
-
- click-lock vinyl plank,
-
- floating flooring systems.
Floating floors need space for expansion and contraction.
Many beginners forget to check dishwasher height clearance after adding flooring. This can make future appliance removal very difficult.
Marking Out Your Kitchen
Now it is time to mark cabinet positions on the walls.
Use a level and pencil to mark:
-
- base cabinet height,
-
- wall cabinet height,
-
- appliance openings,
-
- stud locations.
Most base cabinets are around 34.5 inches high before countertops are added. After countertop installation, the final height is usually about 36 inches.
Always secure cabinets into wall studs. Drywall alone cannot safely support heavy kitchen cabinets.
Installing Base Cabinets
Base cabinets should always be installed first.
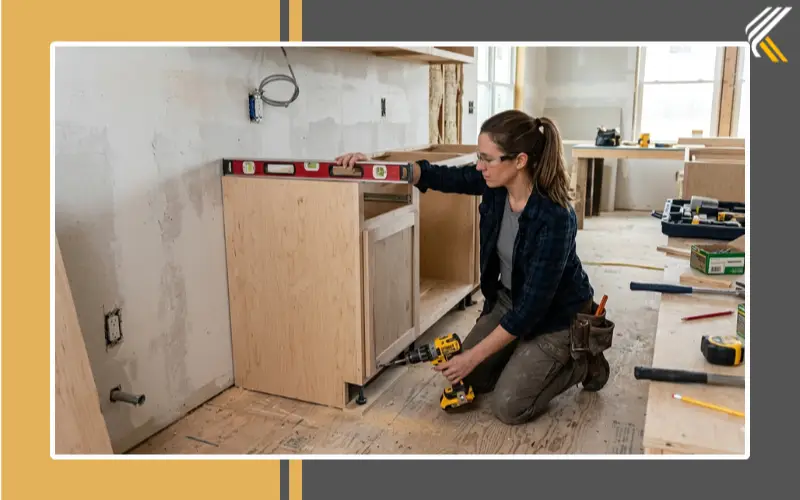
How to Install Base Cabinets
-
- Start in a corner.
-
- Position the first cabinet carefully.
-
- Check level front to back.
-
- Add shims where needed.
-
- Secure cabinets into studs.
-
- Connect neighboring cabinets together.
Take your time during this stage. One crooked cabinet can affect the entire layout.
This became the slowest part of my own kitchen installation because uneven flooring kept changing the alignment.
I had to remove and reposition one cabinet several times before everything lined up properly.
The first base cabinet took me nearly two hours because I kept adjusting the shims and checking the level repeatedly. The remaining cabinets became much easier once the first one was perfectly aligned.
Installing Wall Cabinets
Wall cabinets are usually harder to install because they are heavy and awkward to hold.
If possible, ask another person for help.
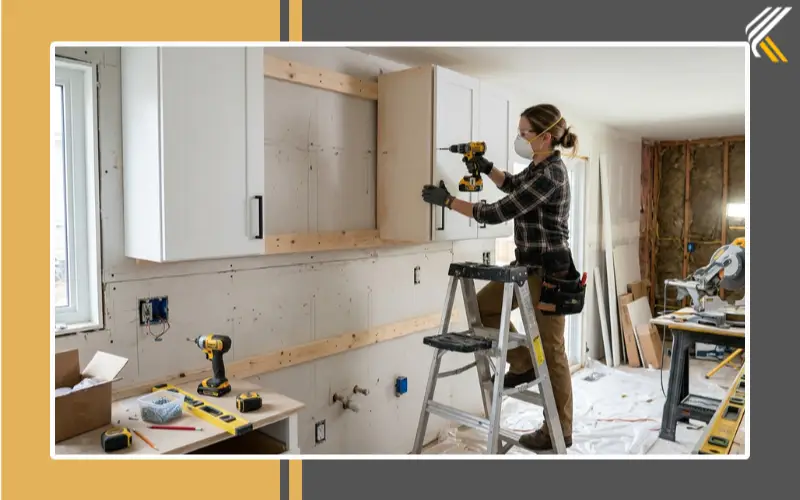
Tips for Installing Wall Cabinets
-
- install upper cabinets before appliances,
-
- use temporary support boards,
-
- secure directly into studs,
-
- check level often,
-
- keep spacing even.
Many solo DIYers use cabinet jacks to safely hold upper cabinets during installation.
Holding a wall cabinet in place while trying to drill into studs was probably the most stressful part of the project. I quickly realized why so many DIYers recommend temporary support boards or cabinet jacks.
What Parts of Kitchen Fitting Are Hardest Alone?
Some kitchen installation tasks are difficult for one person.
The hardest solo DIY jobs often include:
-
- lifting upper cabinets,
-
- moving heavy appliances,
-
- leveling long cabinet runs,
-
- carrying countertops,
-
- aligning multiple cabinets evenly.
Wall cabinets are especially difficult because they must remain level while being secured into studs.
Even experienced DIYers often ask for help during heavy lifting stages.
Difficulty Level of Common Kitchen Tasks
| Task | Difficulty |
|---|---|
| Painting walls | Easy |
| Cabinet assembly | Moderate |
| Base cabinet leveling | Moderate |
| Wall cabinet installation | Hard |
| Plumbing connections | Hard |
| Electrical rewiring | Very Hard |
| Laminate countertops | Moderate |
| Stone countertops | Professional Recommended |
Fitting Worktops
Countertops must fit tightly and evenly to avoid gaps or movement.
Laminate worktops are usually beginner-friendly. Stone countertops are much more difficult.
Quartz and granite countertops are typically measured and installed professionally because incorrect cuts can ruin expensive slabs.
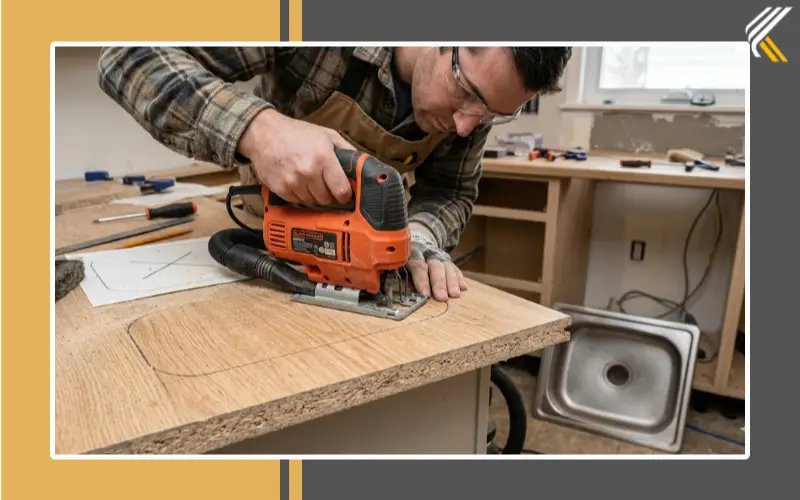
Important Worktop Tips
-
- measure carefully,
-
- seal joints properly,
-
- support long spans,
-
- leave expansion space,
-
- double-check sink cutouts.
Countertop mistakes can become very expensive very quickly.
I measured the sink cutout several times before making the first cut because I knew one mistake could ruin the entire countertop. That part honestly felt more stressful than installing the cabinets themselves.
Installing the Sink and Faucet
After countertops are installed, the sink and faucet can be connected.
Basic Sink Installation Steps
-
- Insert sink into cutout.
-
- Apply sealant around edges.
-
- Tighten mounting clips.
-
- Install faucet.
-
- Connect water lines.
-
- Test carefully for leaks.
Always test plumbing slowly before regular use.
Even small leaks can damage cabinets and flooring over time.
Plumbing and Electrical Work
This area requires extra caution.
Simple tasks like replacing faucets are often beginner-friendly. However, major electrical rewiring and gas connections should usually be completed by licensed professionals.
Important Safety Tips
-
- turn off power before working,
-
- follow local building codes,
-
- test all electrical connections,
-
- never overload outlets.
Most kitchen outlets now require GFCI protection under modern electrical codes, especially outlets near countertops and food preparation areas.
For electrical safety requirements in the USA, homeowners can review modern kitchen outlet guidelines from the National Electrical Code (NEC) overview.
Even after watching several tutorials, I still felt uncomfortable touching electrical wiring. Hiring a licensed electrician for the final connections gave me peace of mind and helped the project pass inspection smoothly.
If you feel unsure during electrical or gas work, hire a professional immediately.
Do You Need Permits for a DIY Kitchen Remodel?
Many DIY kitchen projects in the USA require permits.
You may need permits for:
-
- electrical upgrades,
-
- plumbing relocation,
-
- gas appliance installation,
-
- structural wall changes,
-
- ventilation system changes.
Permit requirements vary by location, so always check local regulations before starting work.
Skipping permits can create:
-
- inspection problems,
-
- insurance issues,
-
- safety risks,
-
- lower resale value.
Cosmetic updates like painting cabinets or replacing hardware usually do not require permits.
Homeowners can also review renovation guidance from the U.S. Department of Housing and Urban Development (HUD).
Kitchen Ventilation and Extraction Tips
Good ventilation is essential in every kitchen.

Cooking creates:
-
- grease,
-
- steam,
-
- smoke,
-
- moisture,
-
- heat.
Without proper airflow, moisture and grease can slowly damage cabinets and walls. In kitchens with high moisture levels, a dehumidifier for kitchen cabinets can help reduce condensation, odors, and mold buildup inside cabinets over time.
Types of Kitchen Ventilation
Ducted Range Hoods
These vent air outside the home and usually provide the best performance.
Ductless Range Hoods
These filter and recirculate air back into the kitchen. They are easier to install but less effective for heavy cooking.
Good ventilation also helps reduce mold and moisture buildup.
The U.S. Environmental Protection Agency (EPA) indoor air quality guide explains how moisture, smoke, and pollutants can affect homes over time.
Kitchen Lighting Tips
Lighting affects both kitchen appearance and functionality.
A good kitchen usually combines several lighting types.
Task Lighting
Task lighting improves visibility while cooking.
Examples include:
-
- under-cabinet LED strips,
-
- pendant lights,
-
- bright countertop lighting.
Ambient Lighting
Ambient lighting provides overall room brightness.
Popular options include:
-
- recessed lighting,
-
- ceiling fixtures,
-
- flush-mount lights.
Accent Lighting
Accent lighting adds decorative detail.
Examples include:
-
- cabinet lighting,
-
- toe-kick lighting,
-
- decorative pendants.
Plan lighting early so wiring installation becomes easier.
Installing Appliances
Appliances should fit comfortably inside their planned spaces.
Measure:
-
- width,
-
- depth,
-
- height,
-
- ventilation clearance.
Carefully install:
-
- refrigerators,
-
- dishwashers,
-
- ovens,
-
- microwaves,
-
- range hoods.
Always follow manufacturer instructions carefully.
I nearly forgot to leave enough clearance space behind the refrigerator for ventilation. Thankfully, I caught the problem before pushing the appliance fully into place.
Adding the Backsplash and Finishing Touches
The final details help bring the kitchen together.
Common finishing tasks include:
-
- backsplash installation,
-
- cabinet handles,
-
- caulking,
-
- trim pieces,
-
- painting,
-
- under-cabinet lighting.
Small finishing details can make a major difference in the final appearance.
Biggest Beginner DIY Kitchen Mistakes
- Rushing measurements
- Ignoring uneven floors
- Installing cabinets before checking appliance sizes
- Forgetting ventilation clearance
- Not locating wall studs properly
- Underestimating installation time
- Attempting advanced electrical work alone
Common Kitchen Fitting Mistakes to Avoid
Many DIY kitchen problems happen because homeowners rush the installation.
Avoid These Mistakes
Ignoring Uneven Floors
Uneven floors can create crooked cabinet lines.
Forgetting Appliance Measurements
Always measure appliances before finalizing cabinet positions.
Not Finding Wall Studs
Cabinets can pull away from drywall without proper support.
Rushing Plumbing Connections
Leaks can damage flooring and cabinets.
Skipping Ventilation Planning
Poor airflow can create moisture problems.
Buying Cheap Materials
Low-quality cabinets may wear out quickly.
Underestimating Installation Time
Most DIY kitchen projects take longer than expected.
One of my biggest mistakes was underestimating how long small finishing details would take. Installing handles, adjusting doors, sealing gaps, and cleaning everything added several extra days to the project.
Typical DIY Kitchen Installation Timeline
| Week | Main Tasks |
|---|---|
| Week 1 | Planning and measurements |
| Week 2 | Demolition and repairs |
| Week 3 | Cabinets and countertops |
| Week 4 | Plumbing, lighting, and finishing touches |
How Long Does Kitchen Fitting by Yourself Take?
The timeline depends on:
-
- kitchen size,
-
- experience level,
-
- project complexity,
-
- unexpected repairs.
Here is a rough beginner timeline.
| Task | Estimated Time |
|---|---|
| Planning | 1–2 weeks |
| Demolition | 1–2 days |
| Wall/floor prep | 2–4 days |
| Cabinet installation | 3–5 days |
| Countertops | 1–2 days |
| Plumbing/electrics | 1–3 days |
| Finishing | 2–4 days |
Most DIY kitchens take between 2 and 4 weeks overall.
Unexpected delays are very common. During my own renovation, uneven walls and damaged cabinet hardware slowed the project more than expected.
I originally planned to finish the entire kitchen in one week. In reality, the project took almost three weeks because unexpected problems kept appearing after demolition started.
When You Should Hire a Professional
DIY kitchen installation is not always the best option.
Hire professionals if your project includes:
-
- gas line work,
-
- major electrical rewiring,
-
- structural wall removal,
-
- stone countertop cutting,
-
- complicated plumbing relocation,
-
- luxury custom kitchens.
Many homeowners use a mixed approach by installing cabinets themselves while hiring professionals for technical work.
When DIY Kitchen Fitting Is NOT Worth It
DIY kitchen fitting can save money, but some projects become too risky or time-consuming for beginners.
Professional help is often worth the cost for:
-
- complex layouts,
-
- large structural changes,
-
- advanced plumbing,
-
- expensive custom materials,
-
- luxury appliance installations.
Mistakes in these areas can become extremely expensive.
Sometimes paying for professional help early can actually save money later. Homeowners working with smaller budgets sometimes choose a kitchen cupboard facelift instead of a full kitchen replacement to improve appearance without major renovation costs.
Is Kitchen Fitting by Yourself Worth It?
For many homeowners, yes.
DIY kitchen fitting can save thousands of dollars while giving you more control over the renovation process. It also creates a strong sense of accomplishment once the kitchen is complete.
Still, the process requires patience, planning, and realistic expectations.
The biggest lesson I learned during my own kitchen renovation was that preparation matters more than speed. Taking extra time to level cabinets and double-check measurements prevented much larger problems later.
If you work carefully and stay organized, fitting your own kitchen can become one of the most rewarding DIY projects in your home.
Call a Professional Immediately If You Notice:
- Exposed damaged wiring
- Gas leaks
- Major water damage
- Structural wall issues
- Mold behind cabinets
- Severe floor sagging
Frequently Asked Questions
Is fitting a kitchen hard for beginners?
Some parts are beginner-friendly, while plumbing and electrical work are more advanced.
Can one person install kitchen cabinets alone?
Yes, but upper cabinets are heavy. Cabinet jacks or extra help make installation safer.
What is the hardest part of fitting a kitchen?
Many beginners struggle most with cabinet leveling and countertop fitting.
Do I need permits for a DIY kitchen remodel?
Many USA locations require permits for plumbing, electrical, or structural work.
How much money can DIY kitchen fitting save?
Many homeowners save thousands of dollars compared to professional labor costs.
Can I fit a kitchen without experience?
Yes, many first-time DIYers successfully install kitchens with proper planning and patience.
What tools do I really need for kitchen fitting?
Basic tools include:
-
- drill,
-
- spirit level,
-
- tape measure,
-
- stud finder,
-
- clamps.
Is DIY kitchen fitting cheaper?
DIY installation is usually much cheaper than hiring full professional labor.
Can I install countertops myself?
Laminate countertops are beginner-friendly, but stone countertops often require professional installation.
What is the hardest kitchen fitting task?
Many homeowners find cabinet alignment and leveling the most frustrating parts of the project.

Biggest Lessons I Learned During My DIY Kitchen Remodel
- Always measure more than once.
- Uneven floors affect everything.
- Cheap tools slow the project down.
- Small finishing details take longer than expected.
- Good planning prevents expensive mistakes.

Conclusion
After completing my own DIY kitchen renovation, I realized that kitchen fitting by yourself is not really about being an expert contractor. It is about learning how to handle problems calmly and carefully throughout the project. Some parts of the renovation were honestly frustrating. I had to relevel cabinets multiple times, adjust appliance spacing after flooring changes, and spend much longer on finishing details than I originally expected. Those experiences taught me that preparation, patience, and accurate measurements matter far more than speed during a kitchen remodel.
One of the biggest lessons I learned is that unexpected problems almost always appear once demolition starts. Uneven walls, hidden plumbing damage, delayed materials, and incorrect measurements are all common DIY challenges. Homeowners who succeed are usually the ones who stay flexible, double-check every step, and understand when professional help is necessary. If you approach kitchen fitting by yourself with realistic expectations and careful planning, the project can save a significant amount of money while giving you valuable hands-on experience and a strong sense of accomplishment once the kitchen is finally complete.
About Kitchenoro
Kitchenoro is your trusted partner for complete kitchen remodeling, renovation, and elegant design. We specialize in premium cabinet installation, countertops, and transforming kitchens into luxurious, functional spaces. With expert craftsmanship and tailored solutions, Kitchenoro turns your vision into reality. Contact us to elevate your kitchen’s style and functionality!