

Installing a quartz countertop in your kitchen is more than an upgrade. It marks the start of a project that blends aesthetics, functionality, and true craftsmanship. Quartz is durable, low-maintenance, and engineered with high-quality materials, giving homeowners the beauty of natural stone with added strength. Its wide range of colors, stain resistance, and hardness make it ideal for any home in Levittown, NY, or beyond.
The installation requires precision and professional handling. Quartz slabs are extremely heavy, and every cut, seam, and support must be handled with accuracy. When done correctly, the transformation brings lasting elegance far beyond a simple DIY project.
How to Install Quartz Kitchen Countertops?- The Short Answer:
Quartz installation involves leveling cabinets, transporting the slab safely, securing it with silicone adhesive, making accurate cutouts, blending seams, and installing edge details and backsplash. Because quartz is heavy and requires specialized tools, professional installation ensures the best, longest-lasting results.
What Are Quartz Countertops?
From my experience as a Professional Quartz Installer with 2+ Years of Field Experience, engineered quartz blends ground natural quartz with resins and pigments to create a durable, non-porous surface. Typical composition includes:
-
90%–95% natural quartz
-
5%–10% resins and pigments
These slabs never need sealing, resist stains, and offer uniform strength. This controlled manufacturing process produces a hard, stable material ready for fabrication and installation in any kitchen.
Pre-Installation Requirements Checklist
Proper preparation prevents installation failures. Before templating, ensure:
Cabinets:
-
Fully installed
-
Level in all directions
-
Structurally secure
-
No wobble or movement
Room Requirements:
-
Walls finished
-
Flooring fully installed
-
Appliances measured and present
-
Plumbing and electrical roughed in
-
Good lighting for template accuracy
Installer Checklist:
-
Confirm slab thickness and overhang
-
Review sink model & reveal style
-
Mark stud locations for bracket placement
-
Verify edge profile
-
Measure appliance clearances
Quartz Slab Selection Guide: Color, Pattern & Thickness
Choosing the right slab improves seam visibility and overall appearance.
Colors & Pattern Movement:
-
Low-movement patterns hide seams best
-
Large veining requires expert alignment
-
Light colors brighten small kitchens
Finishes:
-
Polished (most common)
-
Matte / concrete (modern)
-
Leathered (textured)
Thickness Options:
-
2 cm – often needs plywood
-
3 cm – stronger, fewer supports
-
Jumbo slabs – fewer seams for big islands
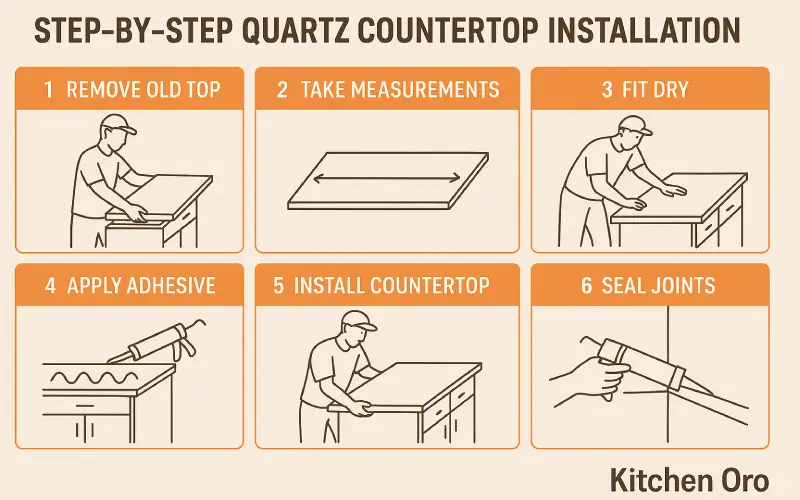
Step-by-Step Quartz Countertop Installation
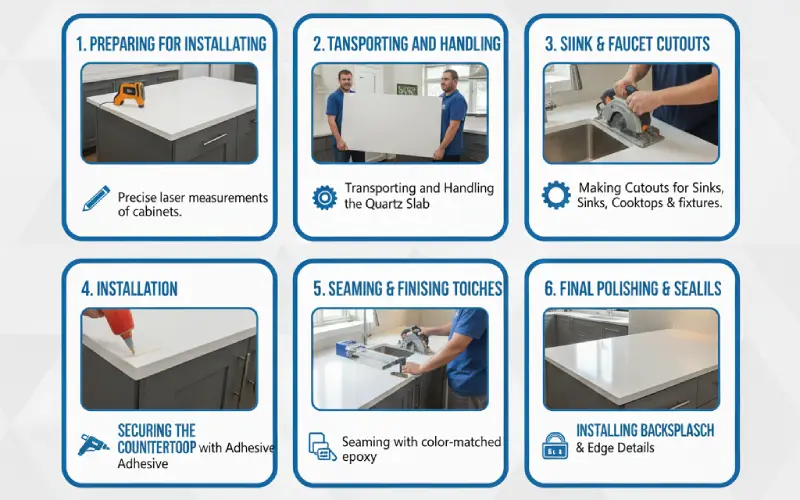
1) Template Creation and Site Preparation
Before cutting the slab, precise templates must be made.
Site Readiness
-
Cabinets must be perfectly level
-
Backsplash walls must be complete
-
Appliances measured and verified
Removing Old Counters
-
Shut off water
-
Disconnect faucet and drain
-
Remove tops carefully to protect cabinets
Template Creation
Installers use Luan strips or digital templating systems to capture:
-
Wall irregularities
-
Sink centerlines
-
Corner angles
-
Overhang requirements
-
Cooktop placement
Real Example:
On a Levittown, NY installation, the back wall bowed nearly ¼ inch. Adjusting the template allowed a perfect fit and prevented a visible gap.
Common Templating Mistakes Homeowners Should Avoid
-
Cabinets not leveled before templating
-
Incorrect appliance models
-
Sink not centered
-
Changing cabinets after templates
-
Missing overhang planning
-
Not accounting for bowed walls
-
Not marking stud locations
Support & Overhang Requirements
Per Caesarstone & MSI guidelines:
Maximum Unsupported Overhangs:
-
2 cm quartz: 6–8 inches
-
3 cm quartz: 12–16 inches
-
Anything more requires steel brackets
Rules:
-
Brackets every 24–30 inches
-
Must support ⅔ of slab depth
-
Dishwasher areas must have structural rails
2) Transporting and Handling the Quartz Slab
Quartz slabs weigh 300–600 lbs and must be handled vertically to avoid breaking.
Installer steps:
-
Use suction cups and A-frame carts
-
Protect corners to prevent chips
-
Dry-fit slab on cabinets
-
Confirm cutout locations
Once positioned, the slab should rest for several hours to stabilize.
3) Securing Quartz Countertops With Adhesive
Installers use high-grade silicone or engineered stone adhesive.
Process:
-
Apply adhesive along cabinet rails
-
Lower slab carefully
-
Press evenly
-
Allow curing for full strength
Silicone is flexible and reduces cracking from minor structural movement.
4) Cutting and Preparing Sink & Cooktop Cutouts
Quartz requires wet-cutting with a diamond blade to prevent heat damage.
Steps
-
Mark cutout
-
Cut slowly to reduce chipping
-
Polish interior edges
-
Test-fit sink or cooktop
Farmhouse sinks require additional reinforcement and precise trimming.
Sink Installation Options
Undermount Sinks
-
Clean look
-
Most common
-
Requires strong silicone seal
Farmhouse / Apron
-
Needs structural cabinet support
-
Must be measured precisely
Drop-In
-
Easiest to install
-
Good for rentals or older cabinets
Reveal Styles
-
Zero reveal
-
Positive reveal
-
Negative reveal
5) Seaming and Finishing
Quartz seams should be clean and nearly invisible.
Installer Process
-
Align slabs precisely
-
Color-match epoxy to quartz
-
Fill seam
-
Buff and polish
-
Clean excess epoxy
Pattern direction and lighting affect seam visibility.
6) Installing the Backsplash & Edge Details
Backsplash Placement
Quartz backsplashes elevate both function and aesthetics. I secure them using strong adhesives for a perfect fit against the wall.
Edge Profiles
I guide homeowners through options of edge profiles like:
-
Rounded
-
Square
-
Beveled
The right profile complements the kitchen’s design.
Joint Sealing
Finally, I seal the joint between the countertop and wall to prevent moisture build up.
Common Installation Mistakes Professionals Avoid
-
Forgetting to level cabinets before templating
-
Dry-cutting quartz without proper dust control
-
Over-tightening sink clips
-
Using the wrong adhesive type
-
Setting slabs flat during transport
-
Not trimming quartz to match bowed or uneven walls
How Professionals Make Quartz Seams Disappear
-
Keep seam width around 1/16 inch
-
Align veining or patterns
-
Avoid seam placement near sinks
-
Ensure cabinets are perfectly level
-
Use pigmented epoxy to match color
Quartz Thickness, Weight & Strength Guide
Quartz weight per square foot:
-
2 cm slab: ~10–13 lbs
-
3 cm slab: ~18–23 lbs
3 cm is more durable, ideal for islands and busy kitchens.
Silica Dust Safety & OSHA Requirements
Quartz fabrication produces silica dust, which must be controlled.
Installers must follow OSHA safety rules:
-
Wet-cutting only
-
Respirators (N95 or higher)
-
HEPA vacuums
-
Eye protection
-
Cutting performed outdoors or in a fabrication shop
This protects workers and homeowners from hazardous dust exposure.
Quartz Countertop Warranty Guide
Most quartz brands offer 10–25 year residential warranties.
Warranty Can Be Voided If:
-
Wrong supports are used
-
Improper adhesive applied
-
Heat damage occurs
-
Install done by unqualified personnel
-
Cabinets were not leveled
-
Chemical damage caused by oven cleaners or harsh solvents
Brand Notes:
-
Caesarstone: strict on heat rules
-
MSI: flexible, but requires pro installation
-
Silestone: lifetime warranty for homeowners
Post-Installation Inspection Checklist
Before installers leave, verify:
-
Seams smooth and tight
-
Countertop level
-
Sink silicone applied evenly
-
Proper support under overhangs
-
Backsplash tight to wall
-
No chips, scratches, or cracks
-
Cutouts correct and polished
-
All adhesives fully cured
When NOT to Attempt DIY Quartz Installation
Do NOT attempt DIY if:
-
Slab weighs more than 150–200 lbs
-
You need a cooktop or sink cutout
-
Cabinets are out of level
-
You need a waterfall edge
-
Walls are bowed or uneven
-
You lack silica-safe equipment
-
You cannot safely move a slab vertically
Quartz installation is a specialized trade requiring experience and equipment.
Environmental & Health Benefits of Quartz
-
Many slabs use recycled quartz
-
Low-VOC binders
-
Greenguard Gold certified
-
Non-porous, safer for food prep
-
Long lifespan reduces waste
Safety & Accuracy Disclaimer
Quartz installation requires professional handling due to weight, silica dust risk, and precision cutting. Always use:
-
PPE (eye protection, gloves, steel-toe boots)
-
Dust extraction and wet-cutting tools
-
Proper lifting equipment
This guide is for educational purposes only. Prices vary based on region, material thickness, and fabrication complexity.
-
“For questions about quartz installation, contact our certified team at Kitchenoro.”
Long-Term Quartz Maintenance Guide
Daily Cleaning
-
Mild soap
-
Warm water
-
Soft cloth
Stubborn Marks
-
Plastic scraper
-
Isopropyl alcohol
Avoid
-
Abrasive pads
-
Harsh chemicals
-
Permanent markers
-
Excess heat
Annual Maintenance
-
Check seams
-
Refresh sink silicone
-
Inspect for chips
Quartz is simple to maintain and stays beautiful for years with proper care.
Quartz Countertop Cost Breakdown
National Average
-
Material: $50–$200 per sq ft
-
Installation: $10–$30 per sq ft
-
Typical total: $1,500–$8,000
Regional Pricing
-
West Coast: $90–$130 sq ft
-
East Coast: $80–$120 sq ft
-
Midwest/South: $65–$95 sq ft
-
Texas/Florida: $60–$85 sq ft
Add-On Charges
-
Sink cutout: $200–$350
-
Cooktop cutout: $200–$400
-
Waterfall edge: $800–$2,000
-
Premium edge profiles: $20–$45/ft
-
Full-height backsplash: $800–$3,000
FAQs
1) How are quartz countertops installed?
Prepare area, transport slab, secure with adhesive, make cutouts, align seams, finish edges, install backsplash, and complete final checks.
2) How much does it cost to install quartz countertops in a kitchen?
Typically $59–$130 per sq. ft., averaging around $80 per sq. ft.
3) Do quartz countertops sit directly on cabinets?
Not usually. Many installations require plywood support depending on quartz thickness and cabinet structure.
4) Do I need plywood under a quartz countertop?
It depends on slab thickness. Thinner slabs (1.3 cm, 2 cm) often require plywood for added strength and stability.
Sources & Methodology
This guide is based on verified industry data and standards from:
-
HomeAdvisor Quartz Countertop Cost Guide
https://www.homeadvisor.com/cost/countertops/install-countertops/ -
Caesarstone Fabrication & Installation Manual
https://www.caesarstoneus.com/fabricators/ -
MSI Quartz Installation Guidelines
https://www.msisurfaces.com/countertops/quartz/ -
NKBA Kitchen Planning Standards
https://nkba.org/planning-guidelines/ -
OSHA Crystalline Silica Safety Standards
https://www.osha.gov/silica-crystalline -
Regional installer pricing (NY, NJ, PA, CA, TX)
-
Fabrication quotes and homeowner invoices (2023–2025)
When You Should Call a Professional Immediately
-
Cracked slabs or visible structural stress
-
Cabinets out of level more than 1/4 inch
-
Sink or cooktop cutouts needing reinforcement
-
Seam gaps expanding over time
-
Water damage under the countertop
Editorial & Technical Review Process
This guide undergoes technical review by senior fabricators and designers. Content is updated yearly to meet current fabrication standards, manufacturer guidelines (Caesarstone, MSI, Silestone), and OSHA safety requirements.
Conclusion
Installing quartz countertops blends craftsmanship, precision, and design. With proper preparation, expert handling, and refined finishing, quartz transforms your kitchen into a durable and stylish space. With good care, it stays beautiful for many years.
About Kitchenoro
Kitchenoro specializes in complete kitchen remodeling, premium countertop installation, and professional cabinetry services. With skilled craftsmanship and personalized solutions, Kitchenoro transforms ordinary kitchens into elegant, functional spaces.
Kitchenoro is a licensed and insured remodeling company. Our team follows NKBA, NSI, and OSHA standards for safe handling, fabrication, ventilation, and installation.
Contact us to elevate your kitchen’s style and functionality!