
Traditionally used to store china and silverware, today’s butler’s pantry functions as a prep space, appliance pantry, and organized storage zone. Whether tucked between a kitchen and dining room or built into a spare nook, a DIY butler’s pantry improves workflow while enhancing kitchen design.
A smart butler pantry cabinet design adds value and efficiency. Whether you’re building a small butler’s pantry or tackling a full pantry cabinet DIY project, built-in pantry cabinets keep appliances hidden and dry goods organized—creating a walk-in pantry feel even in compact homes.
If you enjoy practical renovation builds like this DIY butler’s pantry, explore more step-by-step upgrades in our complete Kitchen DIY Projects guide, where we cover cabinetry, countertops, storage systems, and full kitchen transformations.
How to Create a Stunning DIY Butler’s Pantry- Quick Answer:
To create a DIY butler’s pantry, build a sturdy base anchored into wall studs, construct tall and short cabinets from plywood, add face frames for a custom look, and finish with trim to hide gaps. Paint with moisture-resistant coatings and install shelves or appliance storage for function. The result is a seamless built-in pantry cabinet system that blends style and storage at a fraction of professional cost.
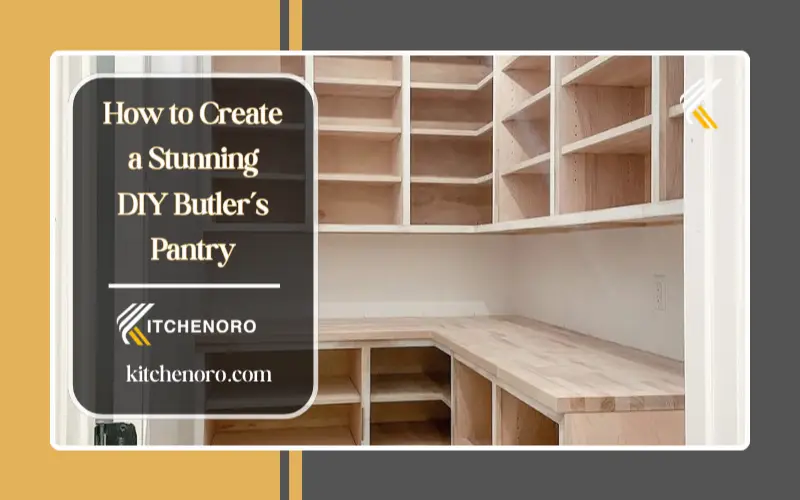
Tall pantry cabinet installation secured into wall studs for structural support.
Estimated Build Timeline
-
Framing and base: ½–1 day
-
Cabinet construction: 2–3 days
-
Installation and trim: 1–2 days
-
Painting and curing: 1–2 days
-
Countertop sealing: ½ day
Total project time: 5–10 days, depending on complexity and drying time.
Supplies
- 3/4 x 48 x 96 in Sande plywood
- 1/4 x 48 x 96 in Sande plywood
- 3/4 x 15 3/4 x 96 in laminate shelf
- 1 x 2 & 1 x 4 select pine
- 2 x 4 stud boards
- Shoe molding, quarter round, crown molding, baseboard
- Latex caulk
- Primer and paint
- Shelf pegs
- Painter’s tape and drop cloths
- 1 1/4 in brad nails
- 2 1/2 in wood screws
- Star bit
Essential Gear
- Miter saw
- Circular saw
- Table saw
- Nail gun
- Drill
- Stud finder
- Straight edge
- Caulk gun
- Paint sprayer
Step-by-Step Instructions
Step 1: Build the Pantry Base
Cut stud boards and assemble the base using pilot holes and wood screws.
1.1 Anchor to Wall Studs
Fasten the base directly into wall studs for structural support.
1.2 Install Laminate Top
Add a laminate top to create proper depth for appliances and lower cabinets.
Safety Note: Cabinets supporting appliances must always be secured into wall studs.
Step 2: Cut the Tall Cabinet & Face Frame
2.1 Measure & Plan
Measure floor-to-ceiling height and wall width. Allow clearance for crown molding and uneven floors.
2.2 Cut Cabinet Panels
Cut plywood sides, top, and bottom panels. Use thin plywood backing to compensate for bowed walls.
2.3 Build the Face Frame
Assemble a face frame from select pine and dry-fit before fastening for square alignment.
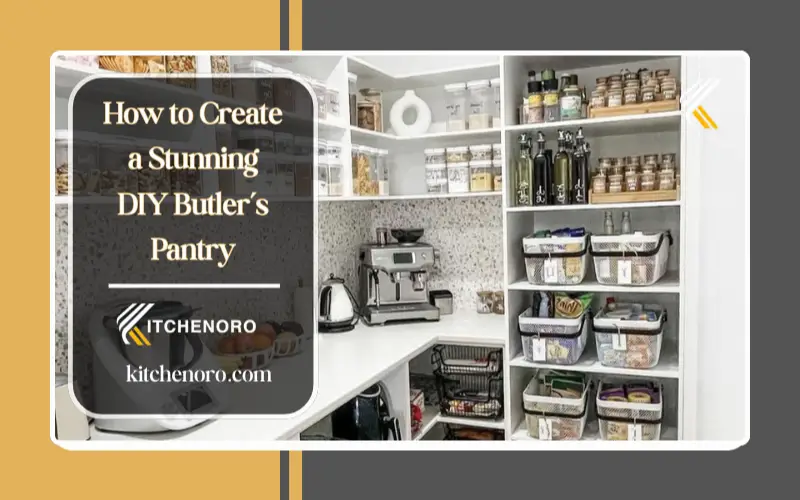
Completed DIY butler’s pantry with built-in cabinets, countertop workspace, and organized storage.
Step 3: Assemble the Tall Cabinet
3.1 Drill Shelf Peg Holes
Drill evenly spaced peg holes on interior panels before assembly.
3.2 Assemble Horizontally
Lay the cabinet flat and attach panels using wood glue, brad nails, and screws.
3.3 Check for Square
Measure diagonals to confirm the cabinet is square before standing upright.
Step 4: Install the Tall Cabinet
4.1 Stand & Shim
Position the cabinet upright and shim at the base and sides until plumb.
4.2 Secure to Studs
Drive screws through the cabinet back into wall studs.
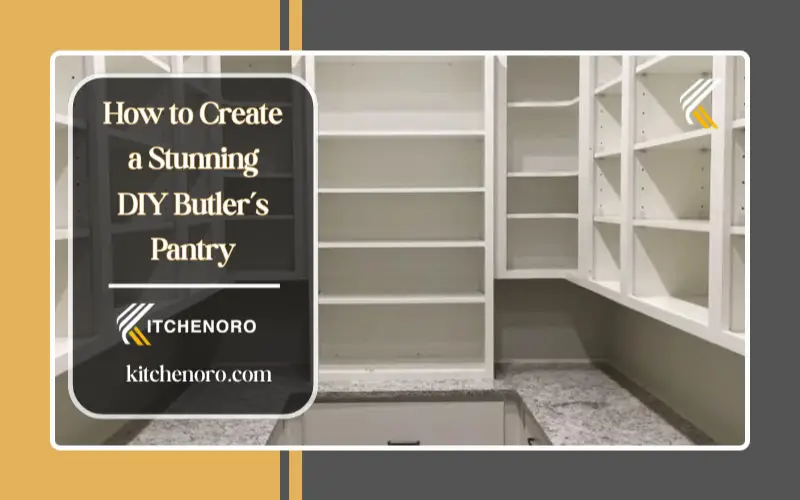
4.3 Add Filler Panels
Install filler plywood to close side gaps and achieve a built-in pantry cabinet look.
Step 5: Build the Short Cabinet
Cut plywood for the lower cabinet box and attach a pine face frame.
Secure using brad nails and pocket screws. Visible screws will be hidden by the countertop.
Step 6: Hide Imperfections with Trim
Install quarter round, baseboard, and shoe molding to fill gaps between cabinets and walls.
Caulk all seams for a seamless built-in finish.
Step 7: Paint the Pantry
- Clean and sand surfaces
- Prime with a moisture-resistant primer
- Apply two coats of satin or semi-gloss paint
- Allow full cure time before loading shelves
For a smoother and longer-lasting finish, follow the techniques in our DIY cabinet painting guide to achieve professional-quality results.
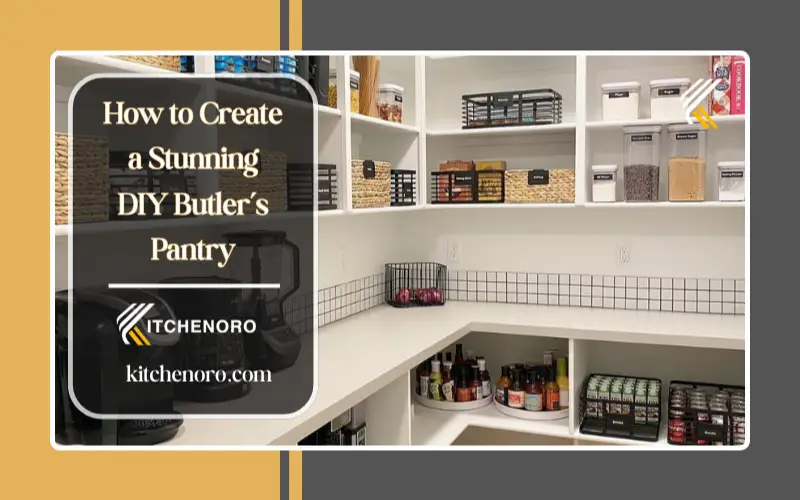
Appliance storage inside a DIY butler’s pantry with ventilated shelving.
Step 8: Add Extra Storage
Install narrow plywood shelves inside the appliance pantry cabinet.
Paint shelves before installing.
If your pantry also stores cooking tools, a DIY knife block can keep sharp utensils safe while freeing up countertop space.
Appliance Ventilation Tip:
Enclosed appliance cabinets should include rear air gaps or vent holes to prevent heat buildup from coffee makers and microwaves.
For even more organized food storage, consider adding adjustable shelving using our DIY pantry shelves guide, which explains how to build strong, space-efficient shelves for dry goods and kitchen staples.
Step 9: Epoxy or Seal Countertops
Epoxy creates a faux marble, durable surface.
Alternatively, seal wood countertops with polycrylic for simpler application.
Step 10: Countertop Options
- Painted plywood
- Herringbone wood pattern
- Faux marble epoxy
- Reused wood offcuts
If you prefer natural wood surfaces instead of epoxy, this DIY waterfall butcher block island tutorial shows how to build durable wooden countertops with a seamless waterfall edge.
Butler’s Pantry Cabinet Design Tips
Design Tip:
Use lighter cabinet colors and vertical shelving in narrow butler pantries to create a walk-in pantry effect without removing walls.
- Match cabinet colors to your kitchen
- Use vertical shelving for narrow spaces
- Add under-cabinet LED lighting
- Hide appliances behind closed doors
- Mix open and closed storage
- Use soft-close concealed hinges and full-extension drawer slides for durability
Common DIY Butler’s Pantry Mistakes to Avoid
-
Skipping stud anchoring, causing cabinets to pull away over time
-
Using MDF instead of plywood in humid kitchens
-
Overloading shelves without center supports
-
Forgetting appliance ventilation inside closed cabinets
-
Painting before final trim installation, leading to cracked seams
Design Inspiration: Modern Farmhouse Butler’s Pantry
A popular design uses sage-green built-in pantry cabinets, open oak shelving, and brass hardware. A narrow quartz countertop provides prep space while hidden outlets power coffee machines and air fryers. This layout works especially well for small butler’s pantries and appliance pantry setups.
Butler’s pantries are also common in luxury kitchen designs, where they hide appliances while maintaining a clean main kitchen layout.
Soft cabinet finishes can dramatically change the mood of a pantry space—our DIY pastel colors in kitchen decor guide explains how to use calming tones for modern kitchens.
DIY Butler’s Pantry Cost Comparison
| Category | DIY Cost | Professional Cost |
|---|---|---|
| Cabinets & Lumber | $700–$1,500 | $4,000–$10,000 |
| Countertops | $300–$2,000 | $2,500–$6,000 |
| Paint & Finish | $150–$300 | Included |
| Hardware & Trim | $200–$600 | $1,000–$3,000 |
| Labor | $0 | $3,000–$6,000 |
| Total | $2,000–$6,000 | $10,000–$25,000 |
Before starting a pantry project, it’s helpful to review overall kitchen renovation costs and ROI to understand how cabinetry upgrades impact home value.
If you’re planning a larger cabinet build, this DIY kitchen cabinets cost breakdown explains realistic material budgets and labor savings for custom cabinetry.
DIY vs Professional Butler’s Pantry Cabinets
| Feature | DIY Butler’s Pantry | Professional Pantry |
|---|---|---|
| Cost | Low | High |
| Custom sizing | Full control | Limited |
| Materials | Plywood + trim | Factory cabinetry |
| Time | 5–10 days | 2–5 days |
| Skill level | Intermediate | None |
Mini Case Study: Small Butler’s Pantry Conversion
A homeowner converted a 5×6 ft hallway nook into a compact DIY butler’s pantry using plywood cabinets and painted shelving. The project took six days and cost approximately $3,400. Vertical storage and a narrow countertop now hold appliances and pantry staples while keeping the kitchen clutter-free.
Building Code Disclaimer
Building codes and electrical requirements vary by location. These guidelines are based on common North American residential framing and cabinet load standards. Always verify stud placement, outlet spacing, and ventilation requirements before installing appliances inside a butler’s pantry.
FAQs
1-What is the alternative to a butler’s pantry?
In many homes, modern designs now use sculleries as a smart option instead of traditional butler’s pantries, giving the space greater capability. A butler’s pantry may look charming, but a scullery often works better because it is a fully functioning kitchen with its own sink, dishwasher, and sometimes even a stove, making it both practical and stylish for everyday living.
2- How much does it cost to build a butler’s pantry?
From my own projects, I’ve seen the cost of building a butler’s pantry really varies, as it typically begins around $2,000 and then increases depending on design. On average, it gets closer to $10,000, and sometimes it can even climb to about $25,000. The final number is largely influenced by the size of the pantry, the complexity of the layout, the choice of materials you choose, and the level of customization you want to add.
3- How to design a butler pantry?
When I started working on my own Butler’s Pantry, I realized the best Design Ideas come from how you want it to Match your Kitchen or when you decide to Go Bold with color and layout. I learned to Add Functional Storage Features, Include Counter Space for Prep, and keep Small Appliances tucked away neatly. A simple Sink or a Beverage Fridge can make the area feel complete, and whether you Keep it Hidden or Put it on Display, the key is to Maximize Vertical shelves for easy access.
4- What are the essential items for a butler’s pantry?
A well-planned diy butlers pantry needs practical storage systems, a sturdy bench with space, and enough power points. Choose durable materials, add a sink and tap, plus essentials like a dishwasher, fridge, freezer, and cooking appliances. Good light and some privacy complete the setup.
Authoritative References
-
National Kitchen & Bath Association (NKBA) – Kitchen design guidelines and professional standards
https://nkba.org -
International Code Council (ICC) – International Residential Code for safe cabinet installation and residential construction standards
https://www.iccsafe.org -
American Wood Council – Structural wood and framing guidelines for cabinetry and woodworking projects
https://www.awc.org
Conclusion
A DIY butler’s pantry blends function and style while expanding your kitchen’s storage and prep space. With solid cabinet construction, proper ventilation, and careful trimming, you can create built-in pantry cabinets that feel custom-made—at a fraction of the cost of professional work.
A butler’s pantry is often part of a larger kitchen upgrade, and our DIY kitchen remodel guide explains how to plan layout changes, storage improvements, and renovation timelines.
About Kitchenoro
Kitchenoro is your trusted partner for complete kitchen remodeling, renovation, and elegant design. We specialize in premium cabinet installation, countertops, and transforming kitchens into luxurious, functional spaces. With expert craftsmanship and tailored solutions, Kitchenoro turns your vision into reality. Contact us to elevate your kitchen’s style and functionality!